


{Pssst…find the full reveal of the finished nursery here!}
I didn’t know what those upholstered boxes at the top of windows were called, but I knew I wanted them for the nursery. So, after some research, I realized these things are called cornices…and I made some…

These were actually easier to create than I thought (using this tutorial) but I still managed to make a few mistakes (I’m really bad at math, what can I say?). Regardless they are complete, I can show you how I did it.
With Chris’ help, I cut some 6-foot pieces of 1×10 pine wood down to the correct size for my window. My window width (from each edge of the trim) was 39.75 inches. My brackets added 3/4″ on both sides. So, I cut my front piece to 42.25″. My side pieces were 4.5″ wide. (If you are actually considering making these, please see my little warning about measuring below.)
Once my boards were cut for the front and sides, I wrapped them with batting and fabric, stapling as I went. (Frankie the dog was super disturbed by my loud stapling at 9:30 p.m. while he was trying to sleep on his chair. He was so upset that he eventually retreated upstairs to hide.)

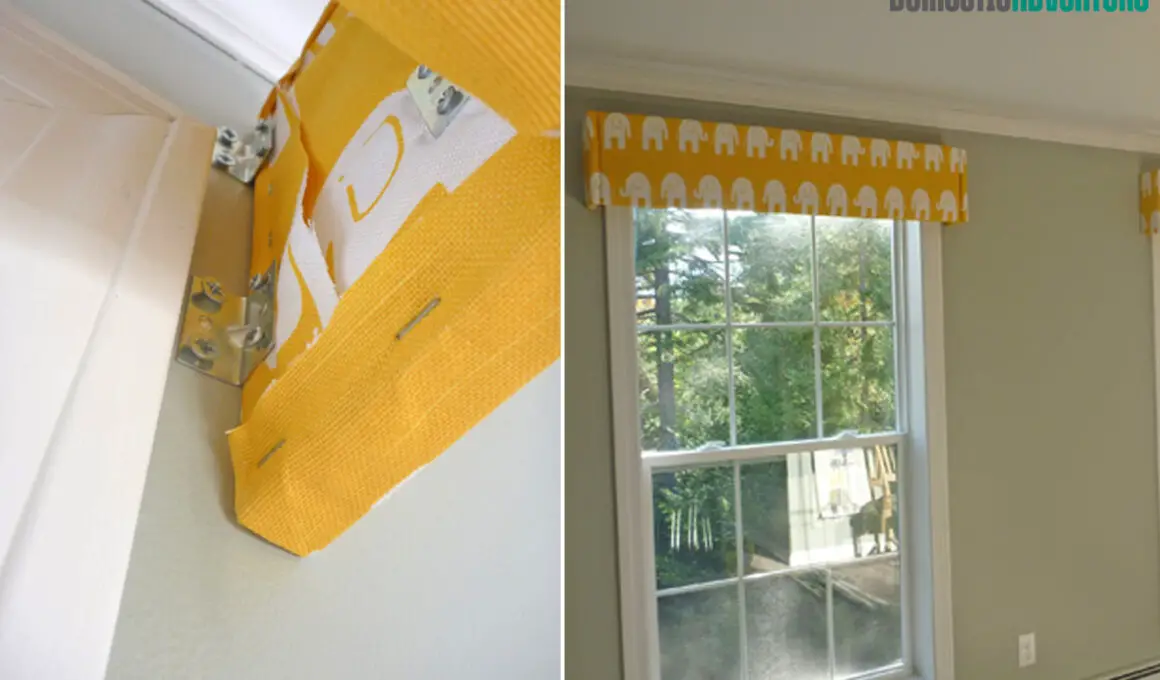
You can see on the photo below how I attached the side pieces to the front panel using L-brackets…
Here is where that aforementioned warning comes into play. Do you see how my side pieces rest even with the front of the front panel (they are both flat against the floor in the picture below)? Well, ideally the side pieces would rest on the back of the front panel so that the “seam” isn’t visible from the front. But, I did not account for the depth of the side pieces (which are about 3/4″), so if they had been attached to the back of the front panel, there wouldn’t have been room for my brackets between the trim and the cornice. My long and drawn-out point is that if you want your seams on the side and not the front, then add enough length on either end of your front panel to cover the depth of your sides. Got it?
Whew….

I’m summarizing a lot of measuring, leveling, and sweating in front of sunny windows when I say that next I simply used another set of L-brackets to attach the whole piece to the wall.

And then they were done, and I was super happy with the finished result. Our sophisticated gray room is starting to look a bit more like a whimsical nursery.

And the two windows paired together look pretty sharp, if I do say so myself…

To finish off the window treatments, I’ll be installing some white roman shades that will hide up behind the cornices when we want natural light and then provide darkness and insulation when we need it.
After spending some time standing in front of those windows on a sunny afternoon, it is fair to say that shades will come in very handy for keeping the room cooler in the summer months.
Because anyone having a baby is on a budget, especially anyone who just constructed two new rooms, I’ll break down our total cost for this custom window treatment:
- Elephant fabric – $8.37 (1.5 yards, on sale!)
- Batting – $2.49
- Pine boards – $13.44 (for 3 1x10x6 boards, and we have some leftover)
- L-brackets – $7.56
Total: $31.86
So, what do you think about this style of window treatment? Have you ever heard of a cornice before?