


Table of Contents Show
As a seasoned homeowner and contractor, I’ve encountered numerous gutter-related issues and successfully resolved them, ensuring satisfaction for many clients. Today, I’m here to share my expertise with you.
Gutters play an integral role in protecting your home from water damage. They channel rainwater away from your foundation, safeguarding your home’s structural integrity.
However, when they start to leak, they can lead to a host of problems, including soil erosion, basement flooding, and damage to your home’s exterior. That’s why addressing gutter leaks promptly and effectively is so essential.
In this guide, we’ll explore everything you need to know about identifying, repairing, and preventing gutter leaks. We’ll cover the types of gutters, from aluminum to copper, and the common causes of leaks, such as clogs or wear and tear.

Identifying Gutter Leaks
Detecting leaks in your gutters is a critical step in maintaining the health of your home. Ignoring or overlooking these signs can lead to more significant, costly damages down the line. Here’s how you can identify if your gutters are leaking:
- Visible Water Stains or Marks: Keep an eye out for water stains or marks underneath the gutters. These are telltale signs that water is escaping from your gutter system.
- Sagging or Misaligned Gutters: Sometimes, the gutter might sag or appear misaligned. This can indicate that water is not flowing correctly and is likely spilling over.
- Overflowing Water: During a rainstorm, observe if water overflows from the sides of the gutter instead of flowing down the spout. This overflow is a clear indicator of a blockage or a leak.
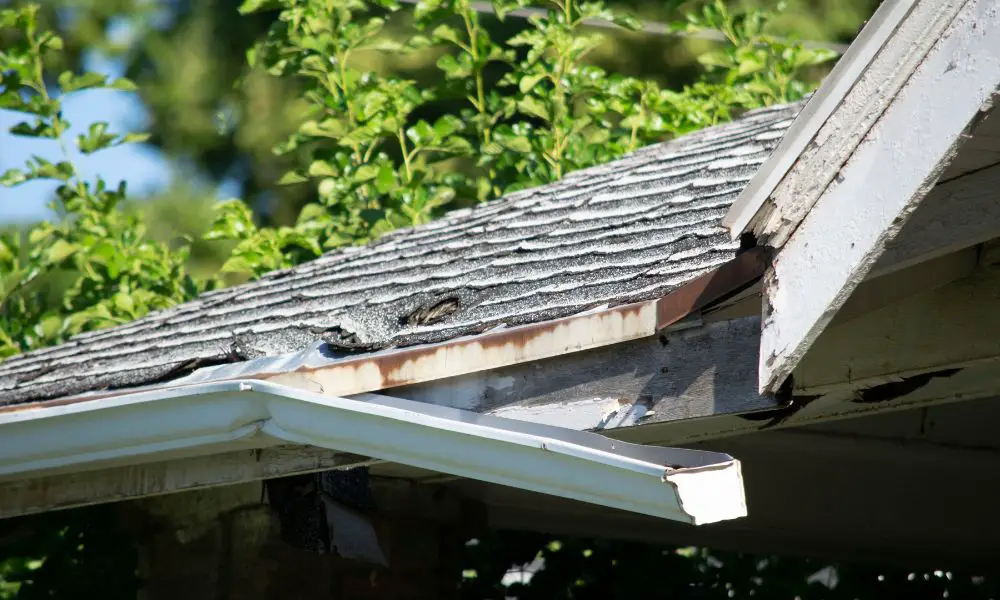
- Peeling Paint or Rust: If you notice the paint on your gutters peeling or rust forming, it’s often because of consistent exposure to moisture, suggesting a leak.
- Dampness or Water Damage: Check the areas around your home’s foundation. Dampness or water damage here can be a result of malfunctioning gutters.
- Plant Growth: Unusual plant growth in the gutters is a sign of stagnant water, which could be due to a blockage causing a leak.
Common Causes of Gutter Leaks
Understanding what causes gutter leaks can help you in early detection and prevention. Here are some common culprits:
- Clogs: Leaves, twigs, and debris can clog gutters, causing water to overflow and eventually lead to leaks.
- Holes and Cracks: Over time, gutters can develop holes or cracks, especially in areas with extreme weather conditions.
- Improper Slope: Gutters need a slight slope towards the downspout for proper drainage. An incorrect slope can lead to water stagnation and leaks.
- Seam Leaks: For gutters with seams, the joints can become weak over time, allowing water to seep through.
- Age and Wear: Like any other part of your home, gutters wear out over time. Older gutters are more prone to leaking due to prolonged exposure to the elements.

Tools and Materials Needed
Fixing gutter leaks efficiently requires the right set of tools and materials. Here’s a straightforward list of essentials you’ll need for the job:
- Ladder: A sturdy ladder is crucial for safely reaching your gutters.
- Gloves: Wear durable gloves to protect your hands from sharp edges and debris.
- Gutter Scoop or Small Trowel: This will help in removing debris from the gutters.
- Bucket: Useful for collecting debris as you clean.
- Garden Hose: A hose is needed to flush the gutters and downspouts after cleaning.
- Screwdriver or Power Drill: Depending on your gutter type, you may need these for tightening or replacing gutter hangers.
- Caulk Gun: Essential for applying sealant.
- Gutter Sealant: A high-quality gutter sealant is critical for sealing holes and leaks. Choose a sealant designed specifically for outdoor use and compatible with your gutter material.
- Gutter Repair Kit: These kits often include patches, sealants, and sometimes tools tailored for gutter repair. They’re especially useful for addressing specific types of damage like holes or separated joints.
- Wire Brush: Useful for cleaning the area around a leak before applying sealant.
- Tin Snips or Scissors: Needed if you have to cut any patching material.
- Measuring Tape: For measuring gutter sections, especially if you need to replace parts.
- Safety Goggles: Always protect your eyes from debris and dust.
- Rust Inhibitor (if needed): If your gutters are metallic and showing signs of rust, a rust inhibitor can help prolong their life.
Step-by-Step Guide to Fixing Gutter Leaks
Fixing gutter leaks involves several steps, each crucial for ensuring the long-term effectiveness of your gutters. Here’s a simple guide to help you through the process:
1. Repairing Holes and Cracks
- Identify Damage: Look for holes, cracks, or rusted areas in the gutters.
- Clean the Area: Use a wire brush to clean around the damaged area. This helps the sealant adhere better.
- Apply Sealant: Use a caulk gun to apply a gutter sealant over small holes or cracks. For larger holes, you may need a patch.
2. Gutter Patching Methods
- For Small Holes: Apply sealant directly.
- For Larger Holes: Use a metal patch that matches your gutter material. Apply sealant around the hole, place the patch over it, and then seal the edges of the patch.
3. Fixing Gutter Slope and Alignment
- Check the Slope: Gutters should slope towards the downspouts, about a quarter inch for every 10 feet.
- Adjust as Needed: If the slope is incorrect, adjust the hangers. Lower or raise them until the proper slope is achieved.
4. Sealing Gutter Joints
- Identify Leaky Joints: Check for leaks at the joints or corners.
- Clean the Joints: Ensure the joint areas are clean and dry.
- Apply Sealant: Generously apply gutter sealant from inside the gutter along the seams. Smooth it out to cover any gaps or holes.
Preventative Measures and Maintenance
Maintaining your gutters regularly and taking preventative measures is essential to ensure their longevity and prevent future leaks. Here are some simple yet effective steps to keep your gutters in top condition:
Using Gutter Guards and Covers
Install Gutter Guards or Covers: These devices are designed to prevent leaves and debris from entering the gutters, reducing the risk of clogs and overflows. There are various types available, such as mesh screens, foam guards, and solid covers. Choose one that suits your environment and gutter type.
Regular Maintenance Tips
- Routine Cleaning: Clean your gutters at least twice a year, preferably in the spring and fall. This prevents the buildup of debris that can cause clogs and lead to leaks.
- Inspect for Damage: Regularly inspect your gutters for any signs of damage, such as rust, holes, or cracks. Early detection can prevent minor issues from escalating.
- Check Downspouts: Ensure that downspouts are clear of obstructions and that water is flowing away from your home’s foundation effectively.
- Ensure Proper Slope: Periodically check that your gutters are correctly sloped towards the downspouts for optimal water flow.
- Tighten Fasteners: Loose gutters can lead to improper alignment and leaks. Check and tighten fasteners and hangers as needed.
- Sealant Check: Inspect the sealant at joints and seams annually and reapply if it is cracking or peeling.
- Trim Tree Branches: Overhanging tree branches can deposit leaves into your gutters and potentially damage them during storms. Keep branches trimmed back from your roof.
- Professional Inspection: Consider having your gutters inspected by a professional annually, especially if you live in an area with extreme weather conditions.
By following these simple maintenance and preventative steps, you can significantly reduce the likelihood of future gutter leaks and extend the life of your gutter system. Remember, a little care goes a long way in keeping your home safe and dry.